Saturday, December 3, 2011

2012 Project: Italvega Nuovo Record


I've been enjoying researching the Italvega/Univega story, and have also been itching to play with an Italian bike.

So, my fun project for 2012 will be this 1971 (I think) Nuovo Record.

Universal mod.61 brakes were OEM, I believe, but this bike will have Universal Super 68 calipers, the brake Universal produced next after the 61. I like the quick release function, and since the 68's were made starting in 68, and this is a 71 bike, these were the current top-line Universal calipers at the time this bike was made. Close enough. Despite my wish to remain relatively original on this bike, I will probably use modern-ish aero levers, simply because I like them.


Photobucket


Photobucket


Photobucket

Photobucket

Photobucket

Photobucket

Photobucket

Photobucket

Photobucket

Photobucket


1984 Univega Specialissima 3rd Version


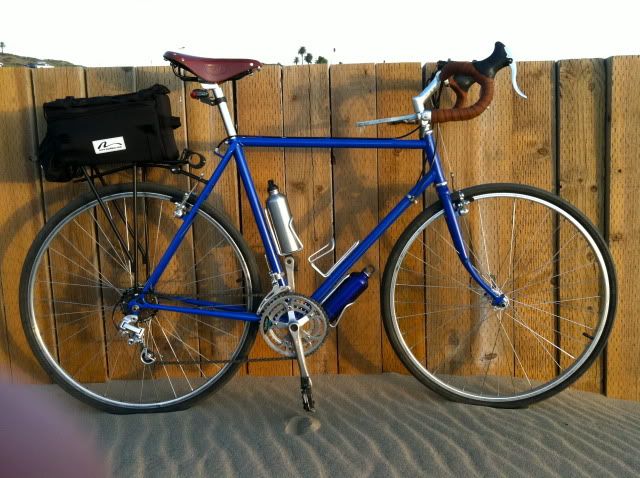
Latest version of the Specialissima - so far it's longest run has been a hilly 23 mile ride with my daughter on the child seat. As the pictures show, she had fun, and so did I!

The bike handles comfortably, as I've been adjusting the fit now for over a year, and fits well.

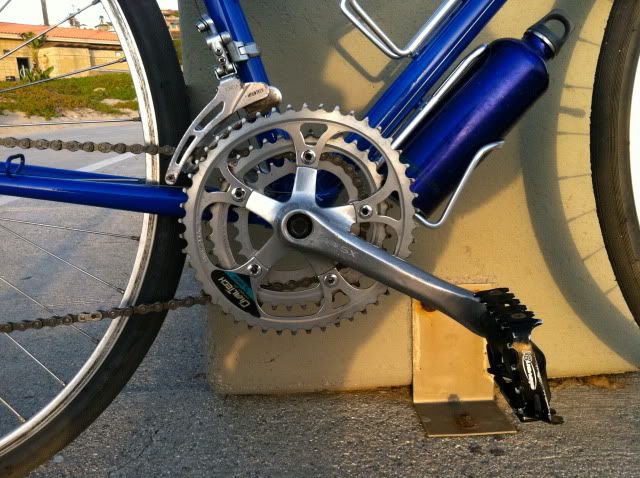
The current drivetrain is the most successful yet, a Sakae "ovaltech" mountain triple coupled with vintage Suntour Mountech FD and Suntour V-GT Luxe Rear Derailleur.

The "ovaltech" cranks, a knockoff of the Shimano biopace cranks, work fine, despite my concerns with setting up a functioning front derailleur. I dont have any stance on whether or not the "biopace" style non-round cranks are actually functional over round cranks in any way. However, this was the cheapest triple I could find, the tooth counts were what I wanted, and I figured (1) I like weird, gimmicky things, and (2) if I hated the rings, i could always switch them out with the round rings I had from a Sakae double I have in the parts bin.

So far, they've worked fine, and I don't really notice any difference from round rings except under load on a steep hill on the smallest ring. In that situation, I can actually feel a difference, and do like it. I have a feeling the final setup will end up being round large and middle rings with the ovaltech granny gear for hills.

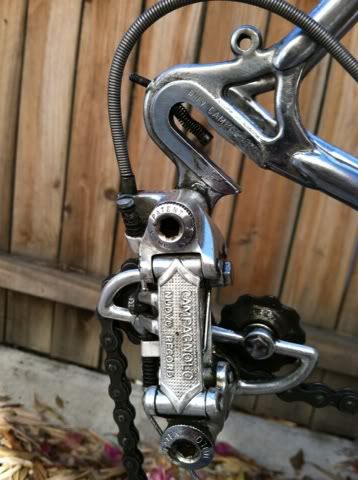
After researching the V-GT Luxe RD on disraeligears.com, I chose this derailleur to be my functional, unbreakable retro derailleur. Mated to Suntour barends, it works flawlessly and still picks up alot of cable.

Next on the list is a possible upgrade to 700c Rims, possibly an internal geared hub I've had in the parts bin for a few months, and possibly a dynohub setup.


Photobucket

Photobucket

Photobucket


Wednesday, September 14, 2011

1984 Univega Specialissima updates

Having sold the SOMA Double Cross, and the Stumpjumper, which I really liked, I was left with one remaining bike in the stable this past month.

The Specialissima was my first build, and after doing a couple bikes, I saw a few things that I thought would make me like the bike more. Essentially, this bike is going to be completely rebuilt..again.. from the first time I put it together, making it really my second and fourth builds.

Taking what I liked from the Stumpjumper build and applying it to Univega's top of the line Specialissima touring frame will hopefully result in the bike I've been trying to build all year - a well fitted, well tuned, vintage steel touring frame with a bit of pedigree, mostly period correct parts with a few modern improvements, and the elusive fitted feel I had from the Stumpjumper when all the parts just "came together" so smoothly.

For me this meant aero routing for both bar end shifters and brake cables, a touring/mountain triple chainring, new front and rear deraillers able to handle shifting the triple, a higher stem, more period appropriate touring style handlebar,  and will eventually mean a brake and wheelset upgrade.

These photos show the upgraded cockpit - the higher handlebar position really increases my comfort in the saddle (I'm not competing in any races), and I really enjoy the completely hidden cable routing. This leaves lots of room for my hands to reposition during longer rides.

I'll get new photos next of the upgraded drivetrain; the bike has a Sakae "ovaltech" triple chainring, and Suntour period correct VG-T Luxe rear derailler and Mountech front derailler. It took a bit of looking to find a front derailler that could handle the wide difference in chainring sizes coupled with the non-round shape of the ovaltech rings. The Suntour bits to their job wonderfully; I'm actually surprised that part of the build was as easy as it ended up being!.

The no-name brakes are terrible - hard to adjust and cheap feeling both in the hand and when used on the bike. Either quality modern brakes or high end period correct versions will be added soon.


Photobucket

Photobucket

Photobucket

Photobucket

Photobucket

Photobucket

Photobucket

Photobucket


Sunday, July 17, 2011

2011 SOMA Double Cross Disc

I got stuck in this project last fall, and never really got out of it. My goal was basically a Long Haul Trucker, but with disc brakes so I'd be especially confident braking with my daughter on the bike on the giant hill by our house.

The parts were all selected with a lot of thought, and I should love this bike, but I just don't. And I don't know why.

The Soma frame is very light, with excellent workmanship, and was the best steel frame I could find with disc brake tabs.

The generator hub works great, lighting up almost as soon as the bike starts rolling.

The SRAM X7 drivetrain shifts reliably and has an extremely wide range - allowing my to tow my daughter up steep hills and still pass spandex guys with her on the bike once we get to the flats...

This bike usually has a Brooks B17 Flyer - things are swapped around on my bikes right now.

Anyways, I think if it had drop bars and bar end shifters I'd like it alot more. Right now, it's basically just a very expensive bike that sounded great on paper, works well, but visually just doesn't work for me.


Photobucket

Photobucket

Photobucket

Photobucket

Photobucket

Photobucket


1984 Stumpjumper Sport Photos

Well, the Stumpjumper is finished - it went quicker than my last build.

I used an aluminum road drop bar, old suntour 6 speed friction barends, an adjustable stem and some old brake levers with suicide levers. I know these are a no-no for bike builders in the know, but the heart wants what it wants!

For the drivetrain, I used the early 90's Shimano Altus groupset I had sitting around since I stripped down my old undergrad bike, with the addition of a SRAM X7 front derailler.

Rims are no-name aluminum 36h 26 inch, with no-name hubs. The goal is to attract as little attention as possible so this bike can be used for errands and surf trips. Nashbar slicks pump up to 100psi and really make this bike go fast considering it's weight! The difference in ride between the 26" rim from 27" or 700c rims is obvious - much faster acceleration, quicker turning, more sturdy feeling over bumps and up curbs, with a tradeoff in top speed. Definitely a good bike for hills and stop/go urban riding.

My trusty Brooks flyer got swapped onto this bike too - it's remarkable how comfortable these saddles are. I've got a b17 too, and couldn't really say which I like more.

Triple A powder coating out of El Monte again did the color job. They are consistently excellent with their detail work around lugs and threaded braze ons.

Anyways, a very fun, sturdy feeling bike that rides alot better than I was expecting!


Photobucket

Photobucket

Photobucket

Photobucket

Photobucket

Photobucket

Photobucket


Saturday, June 25, 2011

New Build: 1984 Specialized Stumpjumper Sport

I'm starting a new build, this time with a closer eye on trying to keep costs under control while still building a quality bike.

The frame is Cromoly and lugged. It's a cool old frame, with a biplane, cromoly fork, and a bit of history as these early stumpjumpers were some of the first production mountain bikes.

Interestingly, I found the seller on blogger.com, so this bike is getting way more attention than it probably should.

Photos next.

1984 Univega Specialissima

This is the first bike I took from beat-up frame to rebuilt and ready to ride.

The idea was to build up a solid touring frame with parts left over from other old bikes. The Univega frames from this time period were Miyata-built, and the Specialissima model was eerily similar in it's features to the Miyata 1000, although I have heard the geometry was distinct between the two models.

I found the frame in a lot of three frames on ebay for a $13.00 bid. Of course the shipping was expensive, and the other two frames ended up being trash. Live and learn. This frame ended up being nicer than I expected, and harder to find than I realized, and exactly my size, so in the end, I was satisfied.

Triple-A Powder Coating, in El Monte, CA did a great job with the bike, with excellent care on the lugs and perfect masking around threaded eyelets and braze-ons. I had heard powdercoating sometimes looked too thick on the bike, but more than one experienced cyclist mistook this for a clean, quality paint job rather than a powdercoat.

My local bicycle co-op, the Bikerowave, in Mar Vista, CA was extremely helpful with some of the more difficult stages, including wheel truing. The bike still needs some adjustment and more wheel truing, but as a first attempt at building a bike from castoff parts, I'm happy with it.


Photobucket

Photobucket

Photobucket

Photobucket

Photobucket

Photobucket

Photobucket